How Can We Help?
Port Trunking QNAP NAS on Ubiquiti switch
Do you have a QNAP NAS with multiple LAN ports and do you want to increase the stability and data transfer? This article will explain how you can do that using port trunking for a QNAP TS-419U+ together with a Ubiquiti switch.
Port trunking is essentially combining multiple LAN ports into one connection. This not only improves the throughput speed but also adds an extra fail-safe for when a port stops working.
Prerequisites
For this situation, it is assumed that you already own a Ubiquiti switch or similar managed switch that is set up.
Additionally, it is assumed that you have a QNAP TS-419U+ NAS or similar already set up.
Take note that if you enable port trunking, Wake On Lan (WOL) no longer works on the QNAP (qnap.com).
Setup
First, make sure that the NAS is plugged into your switch on two or more ports that are chronologically next to each other. If you have two ports put them in 40 and 41 for example. In case you have more ports (i.e. 4) put them adjacent to each other, i.e. 40 – 41 – 42 and 43. Now, log in to your Ubiquiti switch and remove any fixed IP addresses configured for your NAS, if applicable.
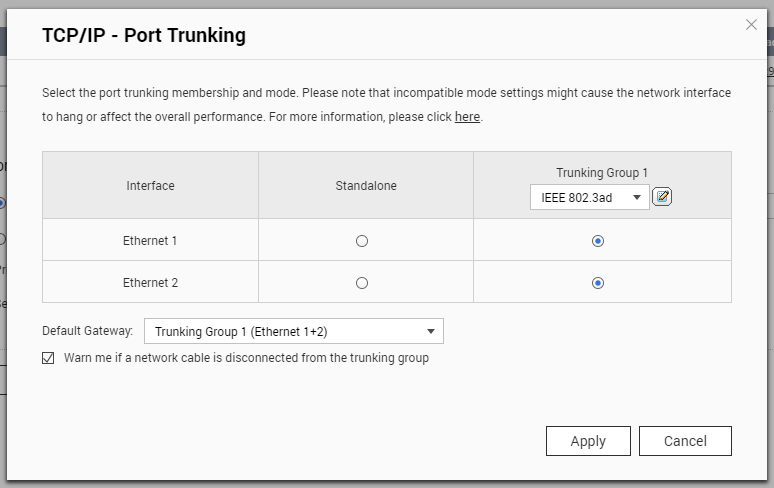
Login to your NAS and navigate to Control Panel – Network & File Services – Network – TCP/IP. Click on Port Trunking. Select the interfaces you want to make part of your trunking group. Select which trunking method, in our case, we choose IEEE 802.3ad. Optionally, enable the warning to warn when a cable is disconnected. Once you are satisfied click Apply.
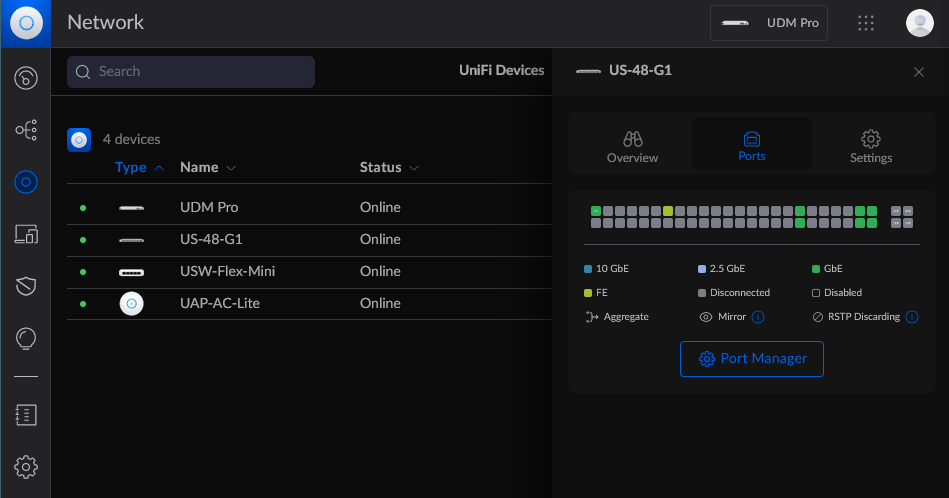
To finalize the aggregation you also need to configure the switch. In this article, we cover a Ubiquiti switch, therefore, login to your UniFi OS and navigate to Network. Select the Unifi devices tab and click on your switch. Next, click Ports and go to the Port Manager.
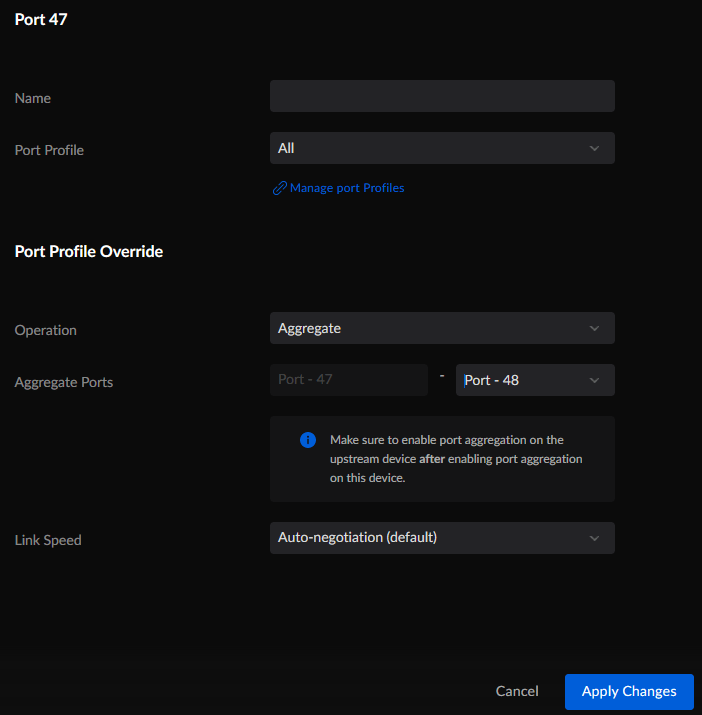
Now select the lowest port number that contains your NAS (i.e. 47). Change the Operation mode to Aggregate, select the last port number that contains your NAS (i.e. 48), and click Apply Changes.
Give your switch and NAS some time to get adjusted to the new configuration and check if the configuration was successful. You can ping the IP address of your NAS until it is available again. Also, check the ports in UniFi OS, there should be no blinking signs in your port. To view the configuration on your NAS, navigate to Control Panel – Network – Network Interface, and expand the Bond. There should be no errors reported by Synology.
Optionally, you can finish the setup by adding a fixed IP address for your NAS. You can do this in the NAS itself, but for ease of use and ease of maintainability, it is recommended to add it to your DHCP server.
First, get the MAC address of your NAS by navigating to the Info Center in the Control Panel and clicking Network. Note down the mentioned MAC address for the created link aggregation (called Bond).
Now go to your router, firewall, or server and add the MAC address with your desired IP address.
6 Responses
Your article contains a lot of useful information. I am grateful for your hard work. Thanks for sharing.
Your dedication and passion shine through in every paragraph you compose. Truly remarkable.
Your passion radiates in your writing, and it’s contagious!
I’m amazed by your remarkable aptitude to transform everyday topics into captivating content. Great job!
Your blog articles brighten my day like sunbeams. I value the positive energy you bring.
Your post has good flow. I appreciated reading it. Thanks for sharing.