How Can We Help?
GitLab recovery – The journey from 12.3.4 to 16.1.1
In the past far, far away I owned a GitLab server running version 12.3.4. I wanted to get this server migrated to the latest version 16.1.1. This article will show you the journey and the challenges of this GitLab recovery.
Prerequisites
Some details of the system and applications for this migration:
- Migrate GitLab 12.3.4 to 16.1.1
- The host operating system is running Proxmox VE 8.0.3
- The operating system for the container is running Debian 12.0.1
Strategy
The strategy for this migration is to back up the data on the old GitLab 12.3.4 server.
Then set up a new container in Proxmox with GitLab 12.3.4 and load the backup on it.
The container will then be upgraded to GitLab 16.1.1.
Optionally, this latest container with GitLab 16.1.1 is then backed up. A new container with GitLab 16.1.1 is installed and the backup is loaded on it. This is an optional but recommended step since the container went through a migration from a very old installation to a very recent one, with all of the configuration consequences.
The migration
Backup old GitLab 12.3.4 installation
Start by going to the old GitLab 12.3.4 installation to create a backup. Before creating the backup make sure to stop any incoming requests and jobs, more information can be found at docs.gitlab.com1. Now, open a terminal to create a backup, do this by running the following command.
gitlab-ctl backup createAfter the backup is finished get the following files from this container using SCP or another method and store them somewhere safe.
- Latest backup from
/var/opt/gitlab/backups gitlab.rbfrom/etc/gitlabgitlab-secrets.jsonfrom/etc/gitlab
Install GitLab 12.3.4 on a new container
In Proxmox, create a new container. Keep in mind that it will be a huge migration so give the container enough disk space (32GB was enough for this migration but it might differ depending on your previous GitLab installation). As per CPU, 4 cores are sufficient and per memory, 4196MB is sufficient.
Trick sysctl
Before we install GitLab we are going to trick the system to prevent running into sysctl issues. During installation, GitLab will attempt to modify kernel values. This will result in the image shown below.
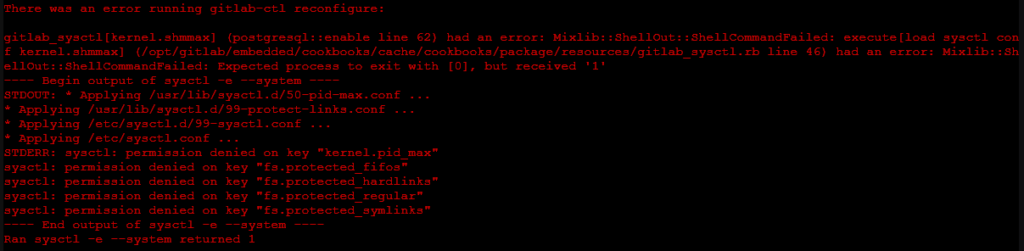
To prevent this we will trick the system by mapping sysctl to true2. This will not harm the system since we use an unprivileged Proxmox container so it is not able to modify the kernel anyway. To trick the system run the command below.
ln -sf $(which true) $(which sysctl)Configure locale
To prevent the warning shown below3 we have to configure a locale.
WARN: Please install an English UTF-8 locale for Chef to use, falling back to C locale and disabling UTF-8 support.To do this run dpkg-reconfigure locales, select en_US.UTF-8, and enter Ok.
Now select en_US.UTF-8 as default and your locale is configured.
Make sure to reconnect to the console before continuing.
GitLab installation
Now we can start the installation by updating and installing the necessary packages for GitLab4:
apt-get update
apt-get install -y curl openssh-server ca-certificates perl
apt-get install -y postfix
To be able to find the GitLab package run the following command.
curl https://packages.gitlab.com/install/repositories/gitlab/gitlab-ce/script.deb.sh | bashSince the GitLab version we want to install is not for our installed OS (Debian 12 a.k.a. Bookworm5), we need to update the sources. According to packages.gitlab.com, GitLab 12.3.4 is for Debian versions 8 (Jessie), 9 (Stretch), and 10 (Buster). Therefore, open /etc/apt/sources.list.d/gitlab_gitlab-ce.list and change bookworm for buster. To update the system to respect these new sources run apt-get update. To check whether our version is in the sources6 you can run the following command.
apt-cache madison gitlab-ce | grep 12.3.4If a package is shown in the output we can continue by installing GitLab7.
apt-get install gitlab-ce=12.3.4-ce.0 2>&1 | tee ~/gitlab-ce_12.3.4-ce.0.logTake note that we added 2>&1 | tee file.txt to the command8, the reason for this is that the GitLab installation prints a lot of output in the terminal. To be able to read this information later we decided to also write the information to a file.
After the installation finishes, validate that GitLab is working by visiting its IP address. In version 12.3.4, you should be prompted to fill in an admin password, you can do this to then log in and validate if all the systems are running.
Restore GitLab backup
Before we load the backup check if there are no background jobs running gitlab.example.com/admin/background_jobs. If there are none, upload your backup files from before to /var/opt/gitlab/backups. Now stop some services from GitLab that might interfere with the recovery.
gitlab-ctl stop sidekiqNavigate to the directory with the backups (/var/opt/gitlab/backups) and restore the backup with the command below, take note that you have to remove the suffix _gitlab_backup.tar from the backup file name.
gitlab-backup restore BACKUP=123456789_2023_07_02_12.3.4After the backup is restored make sure to enable the services again.
gitlab-ctl start sidekiq
gitlab-ctl restart
Upgrade path
Since it is not possible to immediately update GitLab to the latest version the following update path is constructed based on the GitLab documentation9. This documentation also includes important changes and checks for the migration that will be covered later on if applicable.
- 12.3.4 > 12.10.14 >
- 13.0.14 > 13.1.11 > 13.8.8 > 13.12.15 >
- 14.0.12 > 14.3.6 > 14.9.5 > 14.10.5 >
- 15.0.5 > 15.1.6 (GitLab instances with multiple web nodes) > 15.4.6 > 15.11.10 >
- 16.1.1
To upgrade from version to version the command below is used using the version steps mentioned above instead of X.X.X.
apt-get install gitlab-ce=X.X.X-ce.0 2>&1 | tee ~/gitlab-ce_X.X.X-ce.0.logIt is possible to run apt-get clean before/after running the installation to clean the apt-cache to free up disk space.
After each installation the following things have to be checked:
- Check the status of GitLab using:
gitlab-ctl status - Check the Scheduled tab for background jobs at:
gitlab.example.com/admin/background_jobs - Check for background migration jobs via GitLab rails, make sure this number is 0 before going to the next version:
gitlab-rails runner -e production 'puts Gitlab::BackgroundMigration.remaining' - Check the Queued and Failed tab for migration jobs (since GitLab version 14.010) at:
gitlab.example.com/admin/background_migrations - Optionally, you can restart GitLab using the following command, take note that this can be recommended for certain package updates so it is recommended
gitlab-ctl restart
Additional steps before GitLab 14.0.12
Before installing GitLab 14.0.12 make sure to upgrade your storage to hashed storage11. First, check your status by running the following commands.
gitlab-rake gitlab:storage:legacy_projects
gitlab-rake gitlab:storage:legacy_attachments
gitlab-rake gitlab:storage:hashed_projects
gitlab-rake gitlab:storage:hashed_attachments
For each of the commands, it will print the number of projects/attachments per storage.
To migrate to hashed storage run the command below.
gitlab-rake gitlab:storage:migrate_to_hashedTo validate if the migration was successful run the status commands from before.
If you still have files in the legacy storage the runner registration tokens must be reset12. Run gitlab-rails dbconsole and run the following code.
-- Clear project tokens
UPDATE projects SET runners_token = null, runners_token_encrypted = null;
-- Clear group tokens
UPDATE namespaces SET runners_token = null, runners_token_encrypted = null;
-- Clear instance tokens
UPDATE application_settings SET runners_registration_token_encrypted = null;
UPDATE application_settings SET encrypted_ci_jwt_signing_key = null;
-- Clear runner tokens
UPDATE ci_runners SET token = null, token_encrypted = null;
Exit GitLab Rails by entering \q and run the migration command again, followed by the status commands. Now all your files should be in the hashed storage and you are ready to install GitLab 14.0.12.
Additional steps after GitLab 14.3.6
After installing GitLab 14.3.6, all the MigrateMergeRequestDiffCommitUsers must be completed13 before continuing to the next GitLab version.
Check the status by running gitlab-psql and executing the following statement:
select status, count(*) from background_migration_jobs
where class_name = 'MigrateMergeRequestDiffCommitUsers' group by status;
To exit PostgreSQL type exit.
To execute the remaining tasks run gitlab-rails console and execute the following code (use the limit variable to not overload your GitLab server):
# For the first run, only attempt to execute 1 migration. If successful, increase
# the limit for subsequent runs
limit = 1

jobs = Gitlab::Database::BackgroundMigrationJob.for_migration_class('MigrateMergeRequestDiffCommitUsers').pending.to_a

pp "#{jobs.length} jobs remaining"

jobs.first(limit).each do |job|
  BackgroundMigrationWorker.perform_in(5.minutes, 'MigrateMergeRequestDiffCommitUsers', job.arguments)
end
Now navigate to gitlab.example.com/admin/background_jobs and make sure all the tasks in the Scheduled tab are finished.
To check for errors from this specific task run:
grep MigrateMergeRequestDiffCommitUsers /var/log/gitlab/sidekiq/current | grep -i errorOptionally, check the status again in PostgreSQL as described at the start of this section.
Optional: Additional steps during GitLab 15.11.1
During the migration process, I accidentally upgraded to GitLab 15.11.1, this is not recommended. In case you do this too, you might encounter the following PostgreSQL error:
PG::UndefinedColumn: ERROR: column "scan_file_path" does not existTo solve14 this run the following command:
wget https://gitlab.com/gitlab-org/gitlab/-/raw/2d2596045f69668f16c51f34b39be92ae7f5c61a/db/migrate/20220126191624_add_scan_file_path_to_dast_site_profile.rb -P /opt/gitlab/embedded/service/gitlab-rails/db/migrate/Followed by gitlab-ctl reconfigure, this should solve the case.
Additional steps GitLab 16.1.1
Before installing GitLab 16.1.1, the sources can be updated back from buster to bookworm, do this by editing /etc/apt/sources.list.d/gitlab_gitlab-ce.list. To apply the changes run apt-get update. Now you are ready to install GitLab 16.1.1.
Do this by running the following commands (this will also update and clean your system):
# Install and log Gitlab 16.1.1 and other system packages
apt-get dist-upgrade -y 2>&1 | tee ~/gitlab-ce_16.1.1-ce.0.log
# Remove packages no longer needed by the system
apt-get autoremove
# Clean the apt cache storage
apt-get autoclean
apt-get clean
The database has been upgraded a couple of times, if GitLab is running well, you can remove the old data with the following commands:
rm -rf /var/opt/gitlab/postgresql/data.*
rm -f /var/opt/gitlab/postgresql-version.old
Now GitLab is successfully migrated from 12.3.4 to 16.1.1. Optionally, you can create a backup, create a new container with a freshly installed GitLab 16.1.1, and restore the backup to get a cleaner installation.
Optional: Verify Git Version
During the migration, the GitLab installation requires a newer version of Git. GitLab itself comes with an embedded Git version15. To view its version run /opt/gitlab/embedded/bin/git --version.
Sources
- Backup and restore GitLab (docs.gitlab.com)
- cannot set kernel.shmall and kernel.shmmax while installing GitLab Omnibus (github.com)
- WARN: Please install an English UTF-8 locale for Chef Infra Client to use, falling back to C locale and disabling UTF-8 support (forum.gitlab.com)
- Install self-managed GitLab (about.gitlab.com)
- Debian version history (en.wikipedia.org)
- How can I see all versions of a package that are available in the archive? (askubuntu.com)
- Install gitlab-ce 12.9.2 on Ubuntu 20.04 LTS – Version ‘12.9.2’ for ‘gitlab-ce’ was not found (forum.gitlab.com)
- How to run a command while logging output to a file? (unix.stackexchange.com)
- Upgrading GitLab (docs.gitlab.com)
- Check for background migrations before upgrading (docs.gitlab.com)
- Repository storage Rake tasks (docs.gitlab.com)
- Failed to upgrade Gitlab-ce to 14.x (reddit.com)
Upgrade to GitLab 13.4.0 (b0481767fe4) killed all repositories (forum.gitlab.com)
Back up and restore GitLab (archives.docs.gitlab.com) - Upgrading GitLab#14.3.0 (docs.gitlab.com)
- Failure in update_major test (gitlab.com)
- Does Gitaly / GitLab install its own version of git? (forum.gitlab.com)
6 Responses
Your article is nicely researched. We am grateful for the hard work the author put into it. Thanks for posting such an educational post.
This is an invaluable resource for anyone interested in this topic.
This is such a timely topic; I’m glad I stumbled upon your blog.
Your excitement is addictive. It’s nearly impossible not to be enthused by the topics you explore.
I just discovered your blog and I’m already interested! Your content is amazing.
I never thought of that before; your perspective is mind-stimulating.